Cloud Quick Start
Create a dbtrail Cloud account, register your first MySQL server, and start backing up and querying
dbtrail Cloud is the managed edition of dbtrail: the same open-source engine, with a hosted control plane, scheduled backups, team management, and AI integration operated for you. This page takes you from signup to a streaming server in about 15 minutes.
Self-hosting the open-source edition instead? Start with the common Quick Start — it covers the Docker Compose path.
Before you start
Your MySQL server must meet the prerequisites — binary logging in ROW format with FULL row images, InnoDB, and a primary key on every tracked table — and you should create a dedicated MySQL user for dbtrail.
Shortcut: CloudFormation
On Amazon RDS and Aurora, skip the manual parameter group steps — deploy this CloudFormation template to create a dbtrail-compatible parameter group in one click, then attach it to your DB instance (or Aurora cluster) and reboot if needed.
In Your VPC users: you will configure MySQL credentials locally on your agent server, not through dbtrail. You can still create the dedicated user now.
Choose your deployment model
Cloud
dbtrail manages all infrastructure. Best for getting started quickly and teams without ops overhead. Available on all plans.
In Your VPC
You run the agent on your own server. Your data never leaves your network. Pro, Premium, and Enterprise plans.
| Cloud | In Your VPC | |
|---|---|---|
| Agent runs on | dbtrail-managed EC2 | Your infrastructure |
| Your data | Passes through dbtrail infra | Never leaves your network |
| MySQL credentials | Stored in dbtrail's encrypted vault | You manage them locally |
| Plans | Free, Pro, Premium, Enterprise | Pro, Premium, Enterprise |
| Setup time | ~15 minutes | ~30 minutes |
Not sure which to pick? Start with Cloud — you can migrate to In Your VPC later. Most users start with Cloud.
1. Create an account
Sign up at dbtrail.com — once you confirm your email, your organization is created automatically. The Free plan includes 1 server, 7-day change history, and full Claude access.

2. Register and connect your server
Choose a connection method
| SSH Jumphost | Direct | |
|---|---|---|
| Recommended | Yes | No |
| MySQL location | Private network, behind bastion | Internet-accessible |
| Security | Database stays private | Port 3306 open to dbtrail IP |
| Requires | An SSH bastion/jumphost host | Public MySQL endpoint |
| Best for | RDS/Aurora in private subnets, production | Dev/test, quick evaluation |
Whitelist dbtrail's IP before proceeding
44.237.184.31Your jumphost (SSH, port 22) or MySQL server (port 3306) must allow inbound traffic from this IP before you register. If the firewall is not open, registration will fail.
1. Verify your jumphost
Make sure your jumphost allows inbound SSH from 44.237.184.31/32 and can reach your MySQL instance:
# Test SSH to jumphost
ssh -i ~/.ssh/bastion_key tunnel@bastion.example.com echo "SSH OK"

# Test that jumphost can reach MySQL
ssh -i ~/.ssh/bastion_key tunnel@bastion.example.com \
  nc -zv db.internal.example.com 3306
2. Register the server
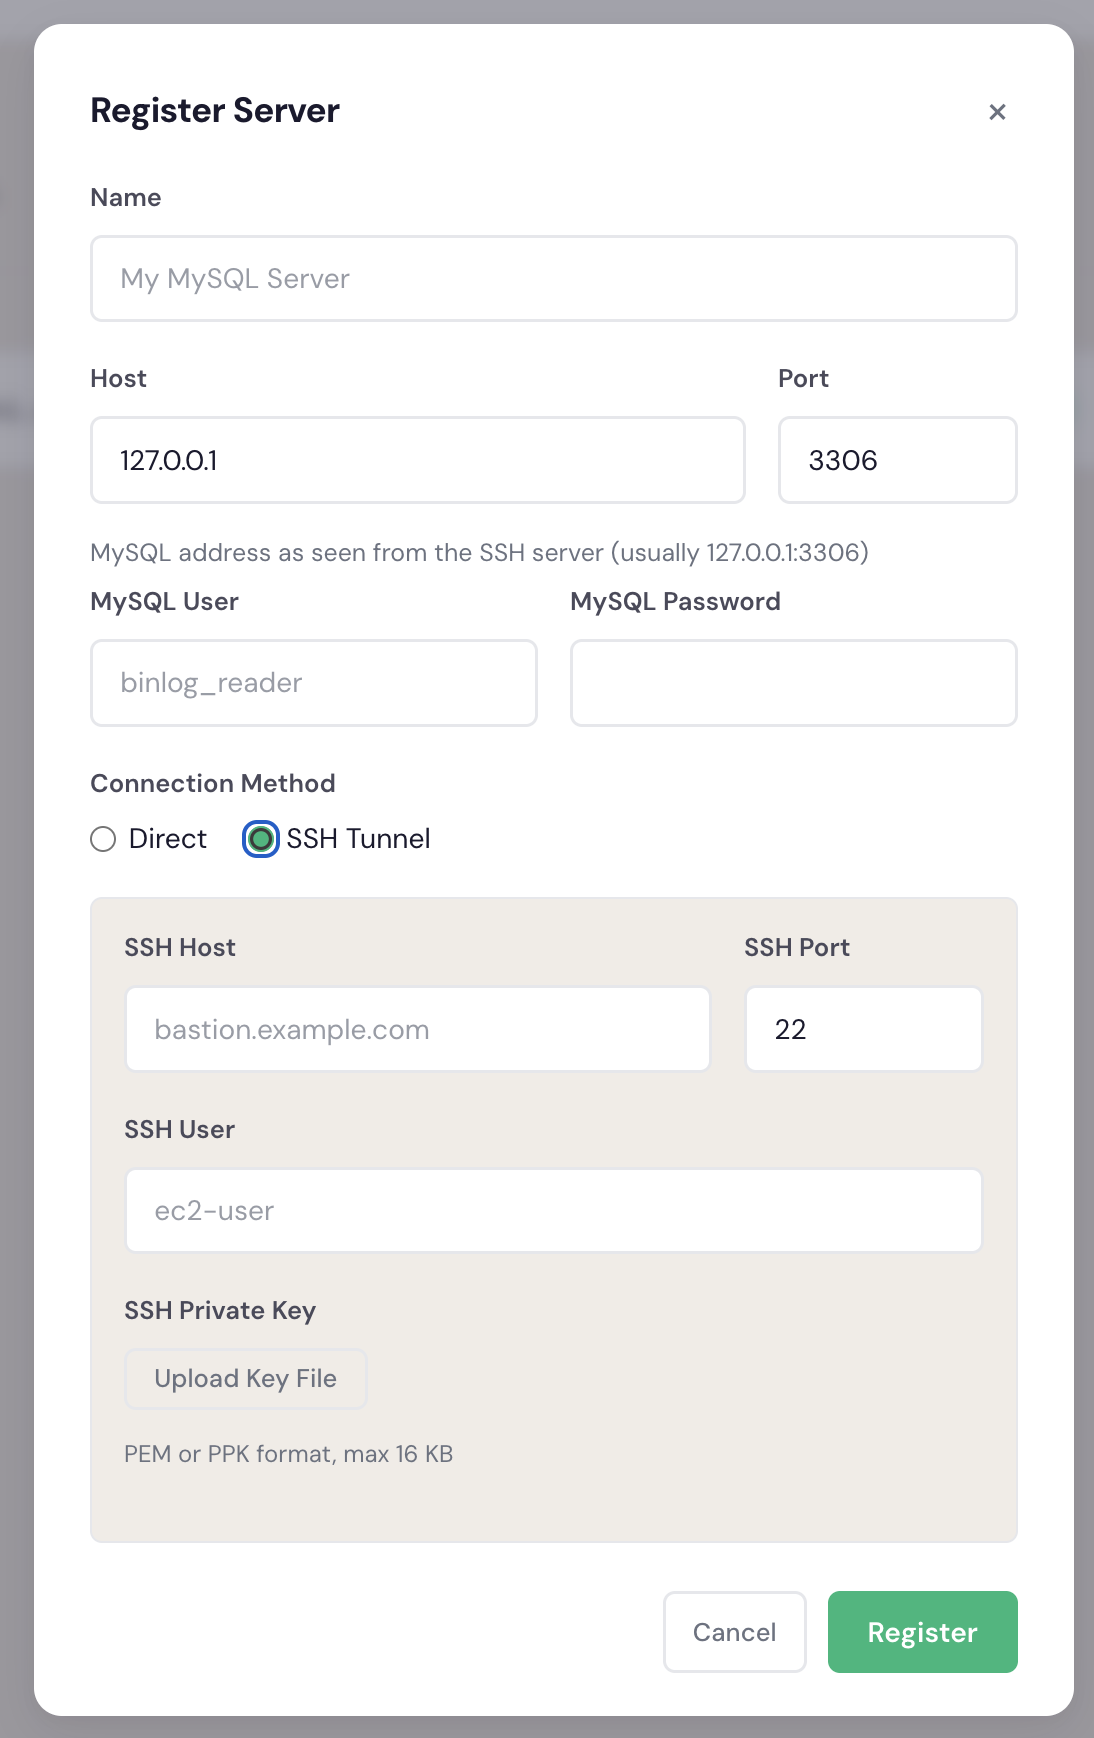
Go to Dashboard → Servers → Register Server and fill in:
| Field | Example | Notes |
|---|---|---|
| Name | production-main | Human-readable label |
| Host | db.internal.example.com | Internal hostname that the jumphost can reach |
| Port | 3306 | MySQL port |
| Connection method | SSH tunnel | Select the radio option |
| MySQL user | bintrail | The dedicated user you created |
| MySQL password | •••••• | Stored securely in vault |
| SSH host | bastion.example.com | Public address of the jumphost |
| SSH port | 22 | Default SSH port |
| SSH user | tunnel | User on the jumphost |
| SSH key | (upload file) | PEM or PPK format |

1. Open network access
Allow inbound traffic on your MySQL port from dbtrail's IP:
- AWS RDS: edit the VPC security group — add inbound rule for port 3306 from
44.237.184.31/32 - GCP Cloud SQL: add
44.237.184.31as an authorized network - Self-hosted: configure your firewall to allow TCP 3306 from
44.237.184.31/32

2. Register the server
Go to Dashboard → Servers → Register Server and fill in:
| Field | Example | Notes |
|---|---|---|
| Name | production-main | Human-readable label |
| Host | db.example.com | Public hostname or IP |
| Port | 3306 | MySQL port |
| Connection method | Direct | Select the radio option |
| MySQL user | bintrail | The dedicated user you created |
| MySQL password | •••••• | Stored securely in vault |
Direct access exposes your database port
This method requires your MySQL port to be reachable over the internet. Prefer SSH Jumphost for production databases.
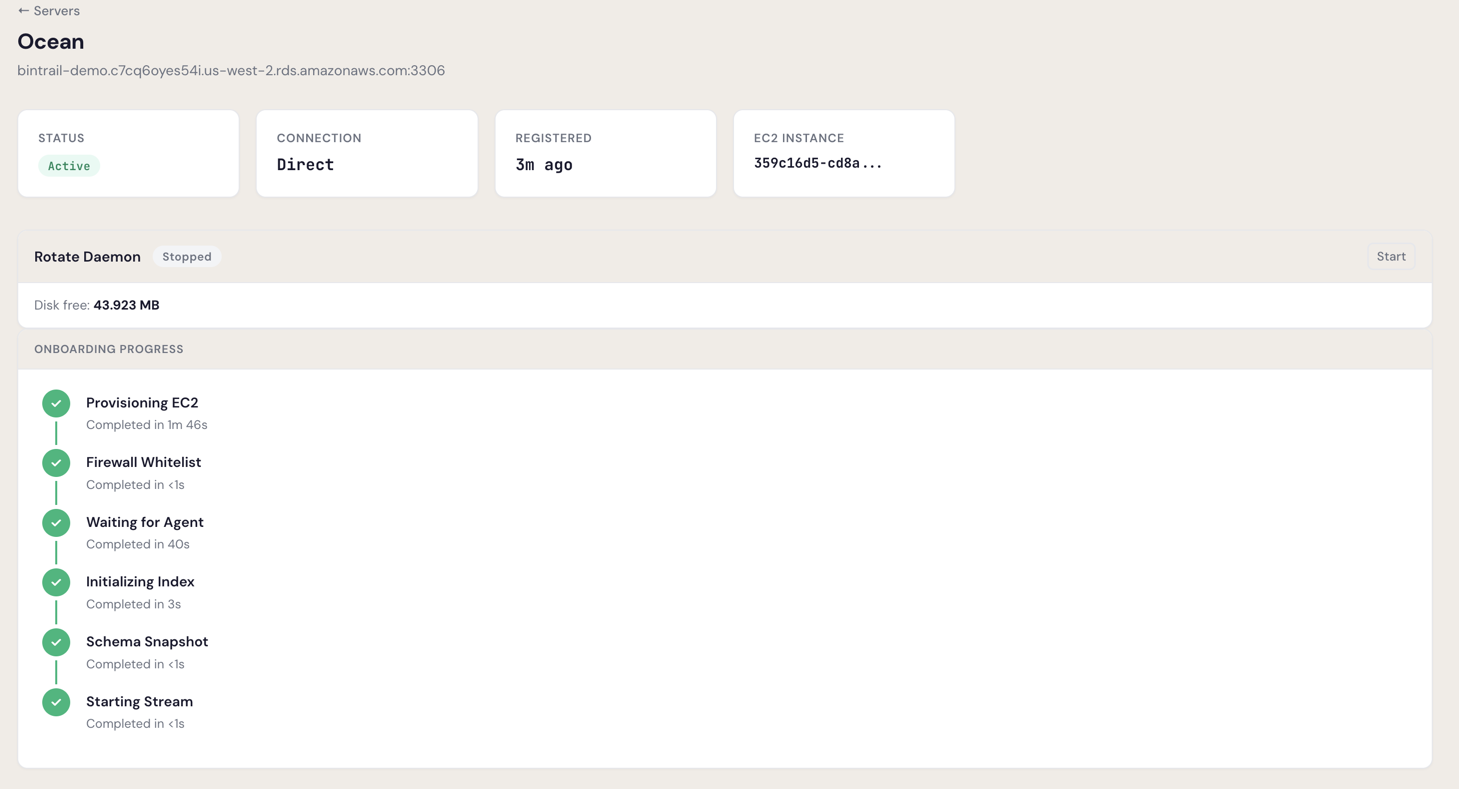
Watch onboarding complete
After clicking Register, dbtrail provisions the infrastructure and connects to your database. This takes 2–5 minutes. Your first server requires admin approval before onboarding begins.
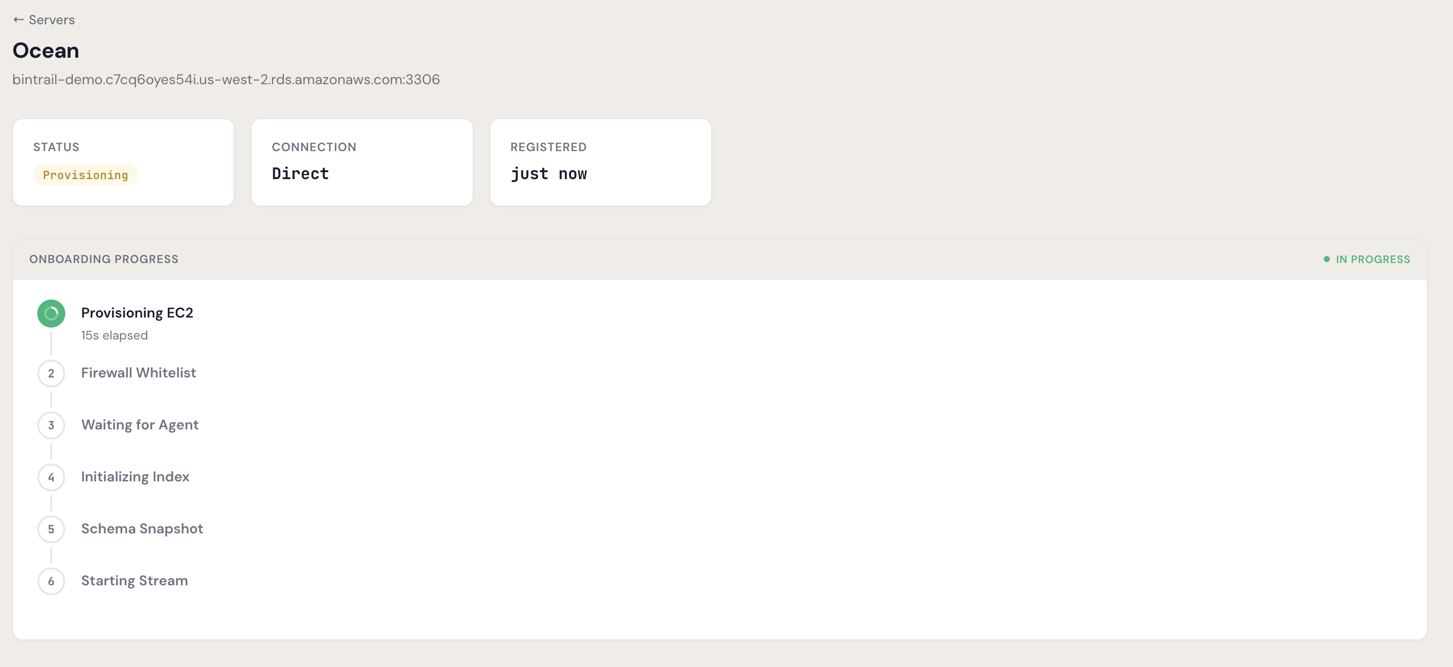
The onboarding steps are:
- Provisioning EC2 — dbtrail assigns compute resources
- Waiting for Agent — the agent initializes
- Initializing Index — metadata index is created
- Schema Snapshot — the agent captures your current schema
- Starting Stream — binlog streaming begins
Once all steps complete, the server status changes to Active:
Stuck on Provisioning?
If the server is stuck for more than 5 minutes, check that the firewall rules are in place and your MySQL credentials are correct. See Troubleshooting for common issues.
With In Your VPC, you run the bintrail agent on your own server. Your data never leaves your network — dbtrail only receives change metadata for indexing.

Pro plan or above required
In Your VPC is available on Pro, Premium, and Enterprise plans. The Free plan uses Cloud (managed agents). Upgrade at any time from Dashboard → Settings → Billing.
What you need
- A Linux server (x86_64 or ARM64) with systemd — does not need to be on the same host as MySQL
- Outbound TCP 3306 to your MySQL server
- Outbound HTTPS (443) to
api.dbtrail.comand your S3 bucket - No inbound ports need to be open — the agent connects outbound
1. Register the server
Go to Dashboard → Servers → Register Server. With In Your VPC, you only provide a name — no MySQL credentials are sent to dbtrail.
| Field | Example | Notes |
|---|---|---|
| Name | production-main | Human-readable label |
| Host | db.internal.example.com | For your reference only — dbtrail does not connect to it |
| Port | 3306 | MySQL port |
Click Register. The server appears with status Provisioning while dbtrail sets up the metadata index (~1 minute).
2. Generate an API key
- Go to Dashboard → Settings → API Keys
- Click Create API Key
- Copy the key — it starts with
bt_live_and is shown only once
Save your API key
The API key is displayed only at creation time. Store it securely — you need it for the agent configuration.
3. Install bintrail
The agent is a subcommand of the bintrail CLI — no separate binary needed:
curl -fSL "https://github.com/dbtrail/dbtrail/releases/download/v0.7.13/bintrail_0.7.13_linux_arm64.tar.gz" \
  | sudo tar -xz -C /usr/local/bin/ bintrail
curl -fSL "https://github.com/dbtrail/dbtrail/releases/download/v0.7.13/bintrail_0.7.13_linux_amd64.tar.gz" \
| sudo tar -xz -C /usr/local/bin/ bintrail4. Configure and start
S3 is required for In Your VPC mode
The agent will refuse to start without --s3-bucket (or BINTRAIL_S3_BUCKET). S3 is the durable store for row events — running without it would silently drop data, so the agent fails fast instead. See dbtrail/dbtrail#289 for context.
The IAM principal the agent runs as (instance profile, or an access key pair via the standard AWS_* env vars) needs at minimum:
{
  "Version": "2012-10-17",
  "Statement": [
    {
      "Effect": "Allow",
      "Action": ["s3:PutObject", "s3:HeadObject"],
      "Resource": "arn:aws:s3:::my-company-dbtrail/*"
    }
  ]
}
Create the service user and environment file:
# Create system group and user
sudo groupadd --system bintrail 2>/dev/null || true
sudo useradd --system --no-create-home --shell /usr/sbin/nologin -g bintrail bintrail 2>/dev/null || true
id bintrail  # verify: should show uid/gid for bintrail

# Create environment file (replace all placeholders)
sudo mkdir -p /etc/bintrail
sudo tee /etc/bintrail/agent.env > /dev/null <<'EOF'
BINTRAIL_API_KEY=bt_live_YOUR_API_KEY
BINTRAIL_ENDPOINT=wss://api.dbtrail.com/v1/agent
BINTRAIL_SOURCE_DSN=bintrail:YOUR_PASSWORD@tcp(YOUR_MYSQL_HOST:3306)/
BINTRAIL_SERVER_ID=99996
# Schemas to monitor (optional — defaults to all user schemas)
# BINTRAIL_SCHEMAS=myapp,analytics
# S3 for Parquet archives (REQUIRED — agent refuses to start without it)
BINTRAIL_S3_BUCKET=my-company-dbtrail
BINTRAIL_S3_REGION=us-west-2
EOF
sudo chown root:bintrail /etc/bintrail/agent.env
sudo chmod 640 /etc/bintrail/agent.env
Install and start the systemd service:
sudo tee /etc/systemd/system/bintrail-agent.service > /dev/null <<'EOF'
[Unit]
Description=Bintrail Agent
After=network-online.target
Wants=network-online.target

[Service]
Type=simple
User=bintrail
Group=bintrail
EnvironmentFile=/etc/bintrail/agent.env
ExecStart=/usr/local/bin/bintrail agent \
  --api-key ${BINTRAIL_API_KEY} \
  --endpoint ${BINTRAIL_ENDPOINT} \
  --server-id ${BINTRAIL_SERVER_ID} \
  --source-dsn "${BINTRAIL_SOURCE_DSN}" \
  --schemas ${BINTRAIL_SCHEMAS} \
  --s3-bucket ${BINTRAIL_S3_BUCKET} \
  --s3-region ${BINTRAIL_S3_REGION}
Restart=always
RestartSec=5
LimitNOFILE=65536

[Install]
WantedBy=multi-user.target
EOF

sudo systemctl daemon-reload
sudo systemctl enable --now bintrail-agent
5. Verify the connection
Once the agent starts, it connects to dbtrail via WebSocket. Within a few seconds the server status changes from Waiting for Agent to Active.
# Check agent is running
sudo systemctl status bintrail-agent

# Follow the agent logs
sudo journalctl -u bintrail-agent -f
30-minute connection window
The agent must connect within 30 minutes of server registration. If it times out, re-register the server and check the agent configuration.
For ongoing agent management (logs, stream control, upgrades), see the full Local Agents guide →.
3. Verify and connect Claude
Once the server is Active, verify capture is working with a quick test INSERT — the dbtrail Cloud tab there covers the dashboard and REST API paths. Then connect Claude to the hosted MCP endpoint and query your change history in natural language. Claude access is included on all plans, including Free.
Next steps
- Server configuration — connection methods, SSH tunnel details, and security hardening
- Configure streams — schema and table filtering, checkpoint intervals, SSL
- Local Agents — run the agent on your own infrastructure
- Recovery guide — generate point-in-time recovery SQL from change history
- Team management — invite members and assign roles
- ProxySQL time-travel SQL (Beta) — query historical row state from any MySQL client via
_flashback/_diff/_snapshotvirtual schemas - Security — how dbtrail protects your data